

In this article, we cover the basic equipment and steps you will need to take to ensure your bike remains in tip-top shape all year round.
Fitting Your Bike
Your bike must fit you. That’s your first important safety feature. If you’re not comfortable, you’re more likely to ride badly and hit something. Getting exactly the right fit depends on many things–including your size and riding style–so you should talk to a bike dealer if you have fit problems. But first, consider these six points.
Frame Size: If your bike’s frame is too tall, too short, or too long, it’s very hard to adjust other things to make you comfortable–so you might need a new bike.
Check the Height: Stand with your bike between your legs. Measure the space between the highest part of the top tube and your crotch. For city riding a one-inch to three-inch space is safest. (This is a general rule. It’s different for other situations, such as off-road riding or with bikes that have a sloping top tube.)
Frame Length: If, when you ride, you feel overly stretched or have pain in your neck, shoulders, or back, your frame may be too long.
- Try moving the seat and handlebars closer together. Also, some people–including many women–have torsos shorter than what most bikes are made for.
- If you’re one of them, you can get a bike with a shorter frame height and raise the seat higher, or get a bike made for people with smaller torsos.
Seat Height: A seat that’s too low will strain your knees, while a seat that’s too high will make it hard for you to pedal and put your foot down. Here are some ways to get the right seat height for city riding:
- Sit on your bike and push one pedal all the way down. Put the ball of your foot on the pedal. If your seat’s high enough your knee should be slightly bent.
- If your hips rock from side to side when you pedal, your seat’s too high.
- Don’t raise your seat so high that less than two inches of your seat post extend into the frame. Most seat posts have a mark showing how high you can raise them.
If you have to raise your seat higher, get a longer seat post.
Handlebars: After you’ve set your seat height, set your handlebars so you feel comfortable. Some things to guide you:
- Start by raising or lowering your handlebars so they block your view of the front axle when you’re sitting on your bike.
- With your hands on the handlebars, your elbows should be slightly bent (not locked).
- Lower-back pain often means the handlebars are too far away, while upper arm or shoulder fatigue often means the handlebars are too close to you.
- Try raising or lowering the handlebars. Or moving your seat forward or backward. You can also change to a shorter or longer handlebar stem.
- Don’t raise your handlebars so high that less than two inches of your handlebar stem extends into the frame.
- Most stems have a mark showing how high you can raise them. If you have to raise your handlebars higher, get a longer stem.
- Rotate your handlebars so that they put even pressure across the palms of your hands without bending your wrists in a strange way.
Seat Tilt: Last, adjust your seat tilt for comfort: Many cyclists keep their seat level, while others have them tilted. If the front of your seat’s tilted too high your butt will hurt, and if it’s tilted too low you’ll slide forward and strain your arms.
Saddle Soreness: If you haven’t bicycled in a while, expect to be sore at first; chafing or soreness should get better with time. If it doesn’t, the first thing to check is the seat adjustment; see Seat Tilt above and Seat Height.
If adjusting doesn’t help, look into a seat pad, a wider seat, a seat with a hole in the middle, or padded or seamless cycling shorts.
Equipping Your Bike
Commuting cyclists have a few simple ideas about equipment that make biking a whole lot safer–and easier. Here’s what they recommend.
Helmet: A must everywhere! A later section has details.
Prevent flats: Keeping your tires at their maximum air pressure gives you fewer flats. Puncture-proof tire liners, self-sealing tubes, and Kevlar-belted tires all help.
Flat Fixer: Every cyclist gets flats, often far from home. Always carry a spare inner tube or a patch kit, and tools to get your tube out.
Use tire irons (best) or a screwdriver (not as good); a wrench if you don’t have quick-release hubs; an old sock to cover your hand when you grab your chain, and a hand pump or a quarter to pay for a gas-station pump. Practice at home beforehand.
Carrying Rack: If you don’t have a rear carrying rack or front basket, you might use a backpack which can strain your shoulders and make balancing harder. Or you might carry things with your arm, which is unsafe because it’s harder to steer and brake.
Instead, make your bike carry your stuff! Use bungee cords to tie things to your carrying rack. If you carry things often you should invest in panniers, the bags that hang from the side of your rack.
Toe Clips: Toe clips give your pedaling more power. But if they’re not adjusted right, the clips can lock your feet to your pedals so you can’t put a foot down when you lose your balance. When using toe clips, make sure you can get your feet out of them fast. Practice it! Nylon straps (Power Grips) serve the same purpose.
Ankle Strap: Getting your pants caught in your chain can make you lose control. If your bike doesn’t have a chain guard, use a strap, clip, or rubber band around your pants cuff to keep it from hitting your chain and frame.
Sunglasses or Goggles: To protect their eyes, many cyclists wear sunglasses or clear goggles, especially with contact lenses. Wrap-around glasses give the best protection. In the winter apply an anti-fogger (some use gel toothpaste) so your glasses don’t steam.
Night and Foul Weather Gear: If you ride at night or in bad weather you need lights, reflectors, and more. See more details in the ‘Riding at Night’ article.
Quick Maintenance Checks
Safety starts with your bike. Whether you use your bike a lot or you’re dusting off an old bike, this page gives you a few simple things to check for a safe ride.
While these checks help you find problems, we don’t have room to tell you how to fix them all. If you need help, go to your owner’s manual, a maintenance book, or a bike shop.
Air: Tires lose a little air every day. If your gauge says a tire is more than five pounds under the needed pressure (printed on the side of the tire), add air. No gauge? Push each tire hard against a curb. If you can flatten it, add air.
Chain: A dry chain can lock up or break suddenly. If your chain squeaks when you pedal or it hangs up when you pedal backward, it’s time to lubricate:
- Grab the bottom of the chain loosely with a lint-free rag. With the other hand turn the pedals backward, sliding the chain through the rag.
- Pedal the chain around twice to remove surface grime.
- With one hand squeeze or spray lubricant onto the chain, and with the other hand pedal the chain backward so it goes completely around once.
- Repeat the first step to get the excess lubricant off the chain. Extra lube can attract dirt.
Wheel Spin: Lift each wheel up and give it a slow spin. Spin the back wheel forward so the pedals don’t move. If the wheel won’t spin by itself or stops suddenly, see whether it’s rubbing against the brake pads, frame, or something else. If the wheel’s not rubbing, the problem might be inside the axle.
Tires: Turn each wheel very slowly and look for big cuts, bulges, bubbles, or places you can see the inner casing. If you spot any, replace the tire. Remove glass or other debris. If the valve stem doesn’t point straight at the middle of the wheel, the rim might cut it; let the air out and straighten the valve.
Shifting: Try all of your gears, shifting each gear lever from high to low. You have a problem if the lever sticks, you can’t shift to all gears, the chain rubs, the derailleur, or the chain jumps off the gears. These are usually caused by worn or dirty cables or a derailleur that needs cleaning or adjustment.
Handlebars: Hold the front tire between your legs and try to turn the handlebars. If they’re loose, tighten the stem bolt.
Brakes: You should adjust or replace the brake cable or pads if you have any of these problems:
- When you apply the brake on each wheel, one or both brake pads don’t touch the rim
- You can squeeze your brake lever all the way to the handlebars
- On each wheel, the brake can’t stop the tire from moving on dry, clean pavement.
Loose Parts: Pick up the bike and shake it hard. Check and fix anything that rattles.
Here are our top five bike tool kits for you:
- Limited product inventory, bike tool kit, bike repair kit, bike kit, bike tire repair kit, bicycle tool kit, bicycle repair kit, bike tire patch kit, mountain bike tool kit, bike patch kit, bike tools...
- Complete Basic Mountian Compact Professional Accessory, Trike Biking, Cycling Trek Road Survival Assembly Fix Multi-tool Mechanic Parches, Supports The Repair In A Harsh Environment And Immediately...
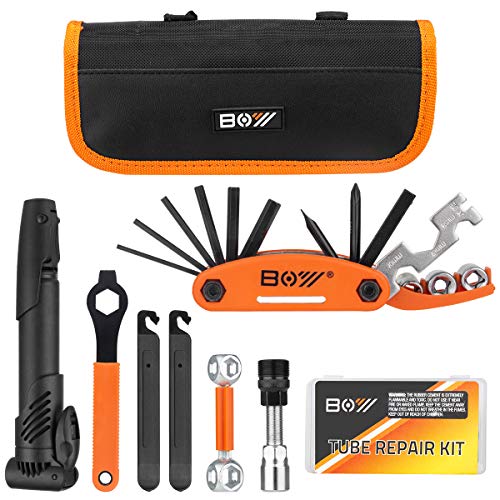
- Bike Repair Kit With Pump And Bag, Bicycle Tube Repair Patch Tool Kit, All Accessory Better Than Other Similar Products—compared To The Repair Function Or The Quality Of Accessories.
- You Can Use A Nylon Velcro To Cling Tightly To The Bicycle Stand And Ride With You Wherever You Want, Without Losing It. Increasing Your Safety Is Our Belief In Our Customers.
- This Product Is Produced For Experience The Most Convenient Bicycle Indoor And Outdoor Tire Repair, Experience And Suggestions Or Problems, We Agree With All Your Views And Fulfill Commitments.
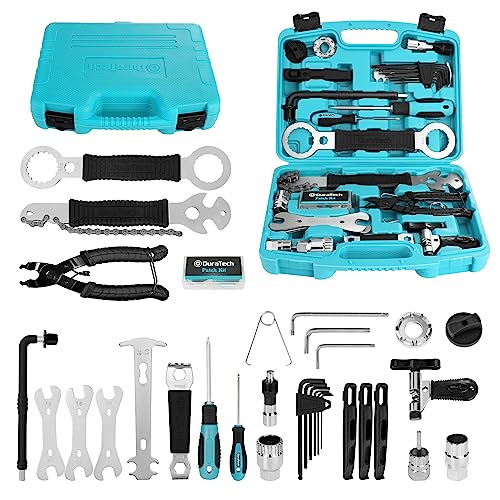
- Complete Kit: Our Bike tool kit includes everything you need to perform both major or delicate work without having to go to bike shop. Contains tools for chain, crank, cassette, pedal, tire and more!
- Higher Compatibility: Our bike repair tool kit covers most of the bike models in existence, and it contains extra special tools to be compatible with certain highly differentiated bicycle parts
- Easy to Use: Bikes grew more complex, so did the tools required. All the unique tools are designed specifically for bicycles, so they are simple enough to use without causing any damage to your bike
- Built to Last: Our bike tool set is made of premium steel, heat treated and surface plated where needed for durability and strength. You can rely on it for daily maintenance, repairs or upgrades
- Convenient Storage Case: Precisely fitting inlay ensures the neatly hold of the bike tool box. The rugged plastic case is also ideal to keep your tools organized and easily accessible

- 【Complete Bike Tool Kit】: The cyclists 22 piece Bike Tool Kit contains all the tools to help you keep your bike in perfect working order, perform routine maintenance, repairs and upgrades.
- 【All-in-One Bike Repair kit Includes】: Freewheel Turner, Bottom Bracket Wrench, Lock Ring Remover, Hub Cone Spanner, Crank Puller, Cartridge Bottom Bracket Tool, Patch Kit, Spoke Wrench, Chain...
- 【Easy to Use】: The Bike Repair Tool Box is a tool set for bike mechanics at home, work or on the road. If you are looking to maintain your own bike or wanting a mobile tool case to take on the...
- 【High Quality Material】: Made in Taiwan. Major in bike accessories more than 10 years, we know a lot about cycling products, this bike tool set made in Taiwan - world excellence of cycling...
- 【Service guarantee】: We truly want you to be happy with your new bicycle repair tool kit and our professional customer service will do whatever it takes to ensure your satisfaction we are offering...
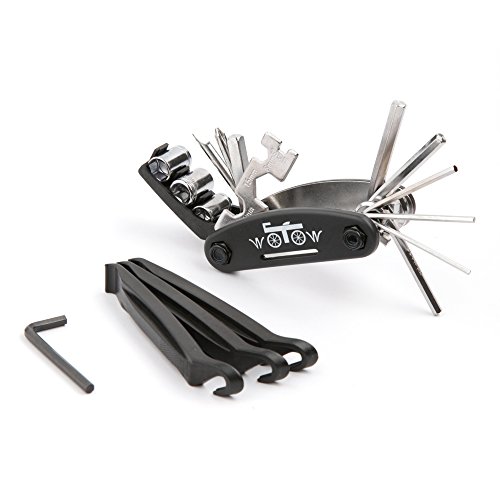
- Built to Last --- WOTOW 16 in 1 multi tool is made by Chrome-Vanadium Steel, corrosion resistant and capable of withstanding high amount of turning force when in use.
- Riding Companion --- Equipped with Allen Key (mm): 2 | 2.5 | 3 | 4 | 5 | 6, Socket Hex Wrench (mm): 8 | 9 | 10 and a Socket Extension Rod, Flat Wrench (mm): 8 | 10 | 15, Spoke 14GE, Slot & Cross...
- Compact & Easy to Carry --- Only at 3.5*1.8*1.1 inch (L*W*H) when folding, mini enough to throw into saddle bags or pocket, portable to carry anywhere and not add load to cyclists.
- Tire Levers --- 3 Nylon tire pry bars are included in the tool kit, easy for cyclists to remove the inner tube and provide assistance during repairing for a flat tire.
- Extra Allen Wrench --- A separate Allen wrench is designed to tighten the bolts if the tool get loose, or to loosen it when the hinge too tight in the first use.

- 【Complete Bike Tool Kit】: The CYCLISTS 23 piece Bike Tool Kit contains all the tools to help you keep your bike in perfect working order, perform routine maintenance, repairs and upgrades.
- 【Easy to Use】: The Bike Repair Tool Box is a tool set for bike mechanics at home, work or on the road. If you are looking to maintain your own bike or wanting a mobile tool case to take on the...
- 【Bicycle Repair Tool Kit Includes】: Chain rivet extractor, Chain ring nut wrench, Crank puller, Freewheel turner&lock ring wrench, Bottom brachet wrench, 15mm pedal wrench, Hex hey wrench(8mm),...
- 【High Quality Material】: Major in bike accessories more than 10 years, we know a lot about cycling products, this bike tool set made in Taiwan - world excellence of cycling products. This tool set...
- We truly want you to be happy with your new bicycle repair tool kit and our professional customer service will do whatever it takes to ensure your satisfaction we are offering a 12-month guarantee.
All About Bike Helmets
Why wear a helmet? Because nearly 1,000 American bicyclists die in crashes each year and around three-fourths die from head injuries. Hundreds more suffer permanent brain damage. Many of these are experienced, careful riders–maybe just like you. And most of these head injuries can be prevented with bike helmets.
You say a helmet’s too much of a hassle? It’d make your head sweat? Mess up your pretty hair? It’s too expensive? You’d look like a geek? Think how good these sayings would look on your gravestone.
Construction: Nearly all helmets today are hard-shell. They have a thin plastic surface on top of a soft foam core. The outer plastic allows it to skid when you hit rough pavement, rather than catch on something and break your neck.
Rating: Look on the inside of the helmet: It should have a CPSC (Consumer Product Safety Commission) certification sticker. The CPSC rating has been required on helmets sold in the US since March 1999. Older helmets may still have Snell, ANSI or ASTM certification.
Helmet Fit: You must have a good fit. A snug fit means that if your head hits and skids, the helmet stays in place. Most brands of adult helmets come in two or three sizes, and you make them fit by adjusting the chin strap and putting foam pads around the inside. Don’t wear your helmet back on your head because it won’t protect your skull if you fall forward.
Test for a Good Fit: The helmet sits level on your head. You can’t shift the helmet to the front, back, or sides of your head. With the straps correctly tightened, you can’t possibly get the helmet off. If the helmet fails these, adjust the straps, put in different pads, or try another size. Ask your bike shop staff to help you with a proper fit.
Cost: Compared to the cost of emergency room visits–or funerals–helmets are cheap. You can get a decent CPSC-rated bike helmet for around $30, although they can run up to $150 or more in price. More costly helmets usually aren’t much safer, but they have better ventilation, weigh less, and look cool.
Ventilation: A helmet’s ventilation depends on front-to-back airflow. Good airflow comes from long, wide air vents. Bald, light-skinned cyclists beware: big air vents can cause weird tan lines!
Weight: Cheaper helmets are usually not much heavier than expensive ones–and most cyclists adjust to them easily. If you think you want a light helmet, test-ride a heavier one to make sure.
Look: You can pay a lot of money for style. But don’t be fooled. No matter how aerodynamic a helmet looks, it won’t help you go faster.
Kids Especially Need Helmets: Many states require helmets on all cyclists under 18 years old. Besides, children aren’t as careful as adults when they ride–so they should always wear helmets. And always put helmets on kids whom you’re carrying by bike; in a collision, very little protects them from flying off of the bike or trailer.
Where to Park Your Bike
Bike Racks: There are bicycle racks throughout most downtown area. These are secure places to park your bike. Check the map pages within this website to see where bike racks are located near you.
Sign Poles: Sign poles aren’t the best places to lock your bike. Before locking to a pole, check whether you can pull it out of the ground. Also, check how easily a thief could remove the sign and slide your bike over the top of the pole.
Parking Lots: Some public parking lots provide bike racks and or lockers. Those that don’t may still allow you to park, for a small fee. If you forget your lock, look for an attended parking lot.
Indoors: A good way to avoid theft: Park your bike indoors. Some stores and buildings allow bikes inside, if only for a short time. Some employers provide a bike room, with showers and lockers nearby.
How To Secure Your Bike
Always lock your bike. Never leave your bike unlocked–even if you’re leaving it for only half a minute. A thief can unpick a bike lock and steal your bike in seconds. Some parking basics:
Security: Lock your bike to something that’s permanent and not easy for a thief to take. Lock to a bike rack, a parking meter, a metal fence, or big tree. Don’t lock to another bike, a door handle, or a small tree. And if you keep your bike in a garage, basement, or on a porch, lock it.
Visibility: Park where many people pass by and where they can see your bike easily. Thieves don’t like an audience.
Close By: Put your bike where you can get to it fast. Thieves like to steal bikes whose owners are far away.
Types of locks and Security Devices:
U-Locks: Some U-locks are stronger than others; make sure you buy a strong steel alloy lock. (If the manufacturer offers a warranty or insurance, register the lock and write down the lock’s serial number and when you bought it.
For a stronger U-lock, get one or more U-lock cuffs (such as Bad Bones); they can keep thieves from using a lever to pry open your lock. One drawback to U-locks: you can’t lock up to thick objects such as streetlights: for these, carry a thick cable.
Padlocks & Chains: The thicker, the better; chain links and lock clasps should be at least 5/16 of an inch thick. Look for locks and chains that are case-hardened–a process that makes them harder to cut.
Cables: Some cables are actually harder to cut than chains because they don’t snap and thieves can’t pry them open. Use a cable at least 3/8 of an inch thick with a lock as thick, or thicker.
A thief with enough time and the right tools can break any lock. But you can further discourage many thieves if you follow these tips about your bike:
Lock the Whole Bike: You should put your chain, cable, or U-locks through your frame and both wheels taking the front wheel off if you have to. Never lock through your wheel without locking the frame!
Cross Locking: A good way to foil thieves is to use more than one kind of lock. For example, put a U-lock through your frame and rear tire, and put a cable or chain through your frame and front tire.
Placing the Lock: Some thieves can break a lock by putting it against a wall or sidewalk and smashing it with a hammer. If you use a padlock, try to put it where it’s not close to the ground or against a wall or another solid surface.
Ugly Bikes: In urban areas where thieves have lots of bikes to choose from, your bike is less likely to be stolen if it looks old or just ugly. Sorry about that.
Removable Items: When you leave your bike, remove any parts you can’t lock and a thief could steal easily: a quick-release seat, horn, bike bag, pump, water bottle, or lights. If removing quick-release parts is a hassle, replace them with permanent ones.
What’s the first thing to do when you get a new bike? Grin! Then write down its serial number and record the number in a safe place.
Police recover hundreds of stolen bikes each year, but can’t return most because the owner has never recorded, and does not know the bicycle’s serial number.
Identifying Marks: You can discourage thieves by engraving your name or social security number in an obvious place on your bike frame. Or put a card with your name and phone number inside the handlebar tube–so if you find your stolen bike at an auction or flea market, you can prove it’s yours.
If Your Bike Is Stolen: First, find your bike’s serial number if you have it. Then call the police non-emergency number and say where your bike was stolen. You also must give a callback phone number. Police will call you with a report number that you can use for an insurance claim. They’ll call again if they find your bike.
Police Bike Auction: What do the police do with stolen bikes? They hold them for a while, then auction them off. But if you find your stolen bike at an auction, police won’t give it to you unless you can prove that it’s yours.